Subsurface Damage
This is Section 8.7 of the Laser Optics Resource Guide.
Every optic, no matter how meticulously manufactured, will have some level of subsurface damage below the top surface of the optic such as cracks, residual stresses, contaminants, and voids.1 These defects may be caused in the manufacturing process or inherent to the type or quality of the material used. When illuminated with a laser, subsurface damage can increase absorption and scatter, generating heat and leading to decreased throughput. These performance irregularities potentially lead to system failure when using high-power lasers or when a system is under significant mechanical stress.
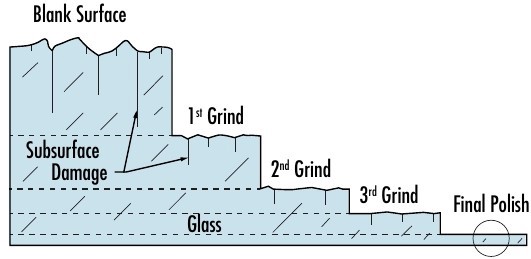
The grinding and polishing process leaves subsurface damage about 0.1µm to tens of microns below the polishing redepostition layer, or the Beilby layer. The redisposition layer is a top layer of the optic that is reflowed over fine surface scratches due to a chemical reaction during the polishing.2 Every grinding and polishing step seeks to remove enough material to reach the deepest subsurface damage from previous steps, decreasing the depth of damage to what is expected to be caused by that current step. Every subsequent step will remove less material (Figure 1).

Figure 1: The amount of subsurface damage left behind from manufacturing processes is decreased after each grinding and polishing step3
Impurities may become trapped within the redeposition layer during polishing unless special laser-grade polishing and cleaning processes are used. Polishing with finer and finer grits can further reduce the amount of subsurface damage, but this damage cannot be removed completely. Polishing with finer grits improves the quality of the optic, but increases the amount of time required for polishing, which in turn increases cost. An effective polishing process for laser optics ensures removal of deep subsurface damage, while an ineffective process simply hides the damage under the Beilby layer.
References
- Fine, Kevin R, et al. “OPTICS FABRICATION: Subsurface Damage Is Measured Nondestructively.” Laser Focus World, June 2006.
- Finch, G. Ingle. “The Beilby Layer on Non-Metals.” Nature, vol. 138, no. 3502, 1936, pp. 1010–1010., doi:10.1038/1381010a0.
- Suratwala, Tayyab. “Glass Finishing (Grinding and Polishing).” Lehigh University Glass Processing Course, March 2015.


 Previous Section


or view regional numbers
QUOTE TOOL
enter stock numbers to begin
Copyright 2023, Edmund Optics Inc., 101 East Gloucester Pike, Barrington, NJ 08007-1380 USA
California Consumer Privacy Acts (CCPA): Do Not Sell or Share My Personal Information
California Transparency in Supply Chains Act
The FUTURE Depends On Optics®